So you’ve got a new classroom! Congratulations! Or maybe you’ve already had your classroom for a while, and you’re looking for ways to change it up and add to it without breaking the bank. In either case, you’re in luck! Today, we’re going to talk about different ways that you might add and create classroom decor that both adds to the visual aesthetic of your room and brings great academic value as well.
When I first decorated my classroom, I was a barrel of enthusiasm with zero vision. I had 10,000 different decorating supplies which had been collected over years of excited hoarding and, therefore, were as unmatching as they all come. I also really didn’t understand best practices for decorating my room, regarding it helping be a source of learning, but also a safe place for students who needed assistance in regulating their emotions.
Luckily for you, I’ve already lived through the rookie mistakes and had to “rebrand” my classroom decor several times, so that you can learn through my mishaps and start out ahead!
So let’s dive in!
What are your “Must Displays”?
The first place to start is going to be to identify what are “must displays” in your classroom. This will vary from school to school, but typically these are things that are mandated either by your district as a whole or by your admin team. They may even be things that, as a grade level, you have all agreed upon to have displayed in your room. For example, in my classroom, we were required to hang up a social contract which we created with our class, as well as a poster that outlined the virtues of the month, a paper that showcased our emergency escape plan with any fire exits, and a spot on our whiteboard for our CHAMPS, and our I Can statements. (If you want to read further about CHAMPS, I have a whole blog post about it, feel free to check it out HERE!)
The expectations for each school will change. However, knowing what must be displayed can be helpful because it allows you to plan for that first and create your space around them, rather than shoving them in at the last minute and feeling frustrated that it doesn’t flow with the way you have designed your space.
What Elements are most important to you?
Now that we’ve taken care of the requirements. Let’s start thinking about what elements are the most important things to you. When you picture your daily routine, what are things you’re excited about or already know you plan to include?
When I first started out, I knew I wanted to have a place that was cozy and inviting to read in. I pictured my class being able to crowd around me seated on the floor while I read them stories and had family meetings at the start of our day. I also pictured them surrounded by books. So I knew I needed to have an organizational system to manage the sheer number of books I wanted to have. I also knew that I needed comfortable seating options, a chair to be able to sit in, and a space large enough to fit a class of 30 4th graders.
There are two important takeaways here. The first is, your vision going into education on what your day will look like may end up being radically different from reality. It may need to be tweaked in the coming weeks or even completely reset before the start of the following school year, and that’s okay. Right now we’re just focused on planning a space that matches what we believe will be happening in our classroom. The second takeaway is that there may be a large variety of different things that you can see yourself wanting to do in your classroom. Try to narrow it down to your most important ones by thinking through which ones will be the most impactful in your students’ educational journey.
How to make your wall real estate count?
It is important to remember when you’re decorating that you need places to show anchor charts, as well as some sort of system that displays student work. A mistake I made when I first set up was I set aside “spaces” on my wall for things that needed to be displayed, but I didn’t actually plan what was going to go on the spaces from the start.
Now once again when we talk about planning, some of these plans may be subject to change, but having an idea from the start can help you tremendously going down the line.
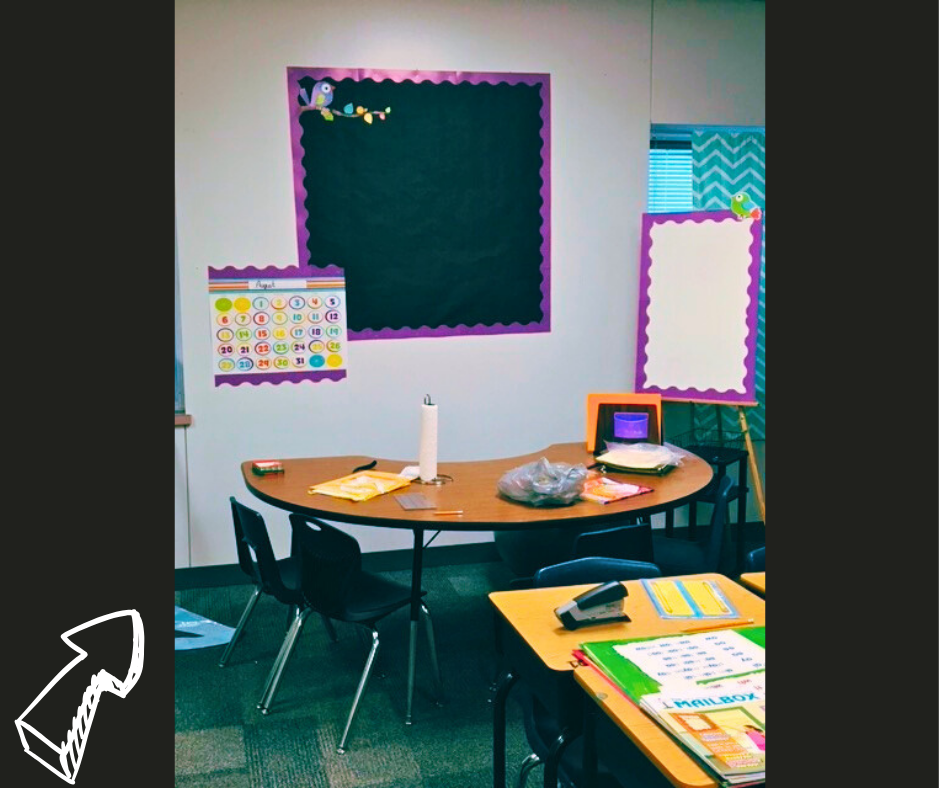
You can see here that I set up this corner with the focus on creating more space to display things while still looking cute. What I didn’t account for was the fact that I chopped off most of my functional display space by making such a small square. It didn’t fit more than one anchor chart at a time, and your classroom display space is super important! There are SO many things throughout the year that you want to show your students and leave up for easy access that I really wasted a lot of opportunity on this wall by making it pretty before making it functional. If I were going to do it over again, I would have measured out how many anchor charts might fit on that wall, and then create a “board” or frame to fit them in if I still wanted to make it look pretty.
Your mantra when setting up your room needs to be, ‘Functionality first. I can shape my aesthetic around it.’
Mistakes to avoid when planning what to display:
The goal of putting academic support posters on the wall needs to be for the students to be able to use it as a resource. That means intentionality becomes the name of the game. When you’re choosing a display piece, we need to ask ourselves:
- How many students can easily see it from their seats around the room?
- If only the first 3 people closest to the wall can see it, it’s too small. You have to either decide to make it bigger or remove it entirely. My experience was that the premade posters from the dollar tree tended to be too tiny for my needs on the display pieces. I stopped wasting my money fairly early on when it came to anchor charts from the dollar tree.
- What is the feasibility of reading the posters?
- There are so many beautiful fonts out there! However, many of them, while they look great on a paper right in front of you, make for terrible posters. Those flowery cursive fonts can be difficult for students to read. What use is a poster that your scholars can’t actually read?
- Visual aids: do they add value or just take up space?
- If I’m planning a word wall, having graphics that accompany the words that help show what the word is talking about can be a GREAT support, especially for any ELL (English Language Learners) or students with a learning disability. However, if the images are completely unrelated, it may be more distracting to the students to have them up than helpful. The age of your scholars can also be pretty relevant here; if I was putting up an alphabet poster display across my wall in a kindergarten classroom, I would expect to see visual support images. However, they may be less necessary to see on an alphabet strip in an upper elementary classroom. It may even be more beneficial to see the letters depicted in cursive rather than print by that stage. Age can play a huge factor in determining the useful value of your visual aids.
- How often will I need to reference this information?
- If this is something that you will refer to every day, then placing it front and center of the room makes sense because it is easy for all students to see without any crazy movements or contortions on their part. However, if this is something that they will only need to reference occasionally, then it may be better to save the space in the front of your class for more important information and to move the less likely to be referenced materials closer to the back. I’ve found that investing in a cheap laser pointer can be helpful for quickly referencing something up on the wall that may be high or in the back of the classroom and gets talked about less frequently.
- How busy is your wall space?
- When you’re planning out your space, you want to keep your walls useful but not overwhelming. When too much is happening around the room, it can serve as a distraction that gets in the way of learning. Try to be mindful of the amount of colors you have going on. This isn’t to say not to showcase bright colors; by all means, pick out happy exuberant colors, but be mindful of how you have them up on the walls. I vividly remember being in a co-teacher’s classroom to cover for her and realizing that while I thought her space was super cool, I couldn’t imagine trying to sit through a lesson there because there was just SO MUCH STUFF in every spot. And mostly decorative stuff, glowing stuff, and baby Yoda-related stuff. It would make for an amazing game room, but seemed visually overwhelming as a place to sit down and focus.
What are some helpful tips to keep in mind about class decor?
- It can be helpful to pick a color scheme theme rather than a specific object theme.
- Originally, my classroom was bird-themed, but none of them matched, and trying to invest in matching ones was expensive. I found that choosing colors was much easier to make a matching theme with; I went with teal and used gray, white, and black as accents to offset the color. If you pick colors, invest in a large pack of cardstock that you can use to print up any materials you create or purchase for your classroom. This also means you can use products that are designed for black and white because your cardstock will carry through the colors you need already. This saves on ink, and most schools have easier access to black and white printing! If you’re looking for more details on how to create your materials, go ahead and subscribe to my blog as I will be coming out with that soon!
- Laminating is going to be your best friend.
- If you’ve gone through all the effort of printing and hanging up, maybe even creating from scratch what you want your display pieces to say, make sure to laminate it! It allows your work to last longer and stand up to those fingers that ALWAYS seem to pick at your papers on the wall. While you’re at it, do yourself a favor and make sure your lamination sheets have a matte finish to help avoid some of the glare that happens with traditional lamination. You can thank me later for that one! 😅😂
- Plan for display pieces that support things you’re going to be teaching.
- For example, I knew that there are certain vocabulary words that trip students up, for example, rows and columns, and horizontal and vertical. I created display pieces that went around the doorways that showed the words going in the directions that the definitions would have it go. For example, Horizontal was on top of the door frame going side to side, but vertical went along the edge of the doorway, with one letter below each other so that each letter hugged the wall. I also added arrows to help reinforce the idea of which direction those words were going. Every time I asked a question about horizontal or vertical, I would point back to that doorway like a lunatic. I was silly about it; I reminded my students repeatedly throughout the year. And at the end of the school year, when I had to remove it for state testing, my students REMEMBERED that vocabulary and what it meant because they could picture the spot on the wall it was, and how silly I was every time I drew their attention back to it.
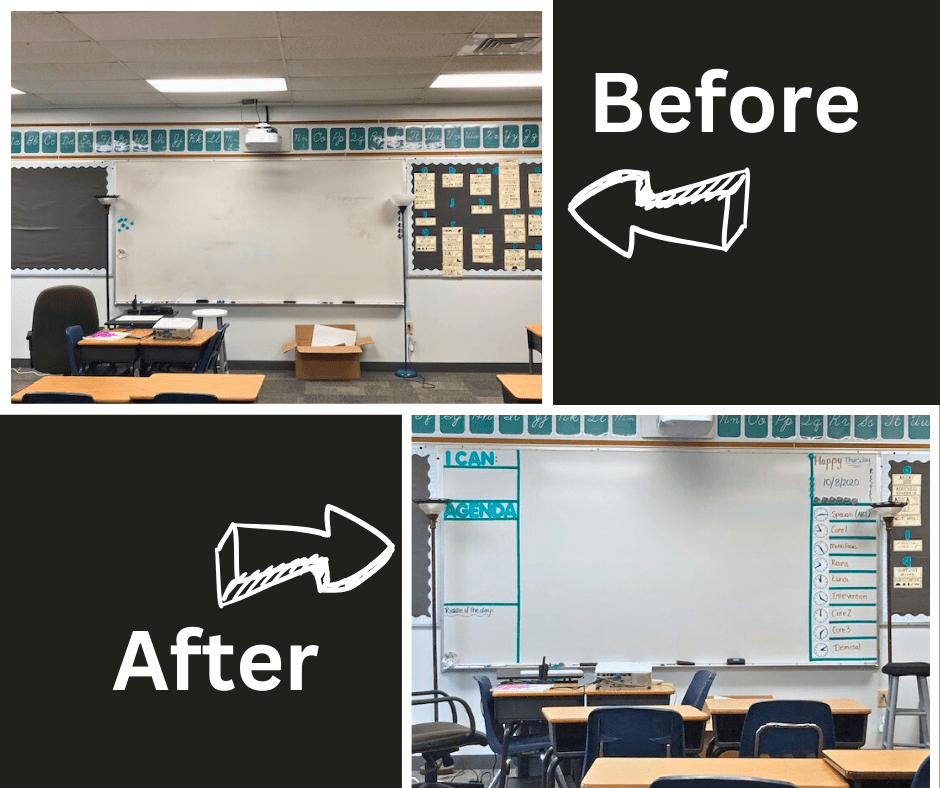
- Washi tape can help you partition off parts of your whiteboard to help you keep information up there organized for yourself as well as your students.
- If there is something you need daily, like the date, make a section for it on your board. If you display your I Can statements or a riddle of the day… Make a section for it! Maybe even your class schedule. You can easily create spots for the information you need on a regular basis and still leave space for your daily writing.
- Think about how likely you are to actually use the setup you’ve established.
- We like to plan for our fantasy selves when setting up our classroom. But in reality, if we’ve never done something like that before, we probably aren’t likely to start now. For example, displaying I Can questions was a requirement at the school I worked at. So, I originally set up a space on my bulletin board with sheet protectors hung sideways because I planned on sliding beautiful printed, I Can statements into the spot each time I started a new lesson. The reality was, I never changed them. I was rarely on top of my photocopying in the beginning of my teaching career. Our copier was also frequently out of ink/toner/and or paper. And I got dinged negatively each time the admin came into my room because my I Can statements posted had NOTHING to do with the lesson plans, I had submitted and were teaching. What I needed was a space on my whiteboard where I could write out our I Can statements and could change as needed without needing a printer’s involvement. That was a much more manageable system, even if it didn’t look as pretty or make me feel as “teachery” as the cute printed I can statement did in my mind.
There are so many great possibilities with what you can do to set your classroom up for success! Make sure you are planning out your room with your students’ needs in the forefront of your decision making and you will have a wonderful room. Inviting and ready for scholars to come and learn!
If you enjoyed these tips for success, don’t forget to subscribe so you won’t miss next week when we dive into the “How-to’s” of actually creating things we want to put on our walls!
You can also click HERE to join my email list, which gives you updates about new posts, as well as exclusive access to all the neat freebies waiting for you in my Free Resource Library!
See you next week!


Leave a comment