
So I’m currently in the stage of life where a toddler has taken over our household. And it is crazy– I’m talking mad chaos. The amount of destruction that can be brought upon our living room in the span of 1 hour is astounding. One of her favorite things to bring to me as she is on her whirlwind mission of madness are shoes. She isn’t the biggest fan of wearing said shoes, but she is obsessed with bringing them all over.
Recently, my husband and I invested in a shoe rack bench seat for the entryway of our house. Previous to this, shoe organization has been a relatively laissez-faire event. What I’ve found fascinating is that shoes are now the only object in our hour that I can dependably rely on our toddler to put in a specific place. I can be in her bedroom, and ask her to put her sparkle shoes on the shoe rack, and with relatively high confidence, expect to come out to the living room and see them in the right spot.
Having a predictable, established location for an item is a game changer when it comes to managing your chaos. And let’s face it– in the classroom, papers almost always spell out chaos.
Over the years, I experimented with a variety of different paper organizational systems. Some were more complex than others. Let’s just say my first-year teacher’s strategy for organizing papers was any surface that was relatively cleared off was a great place to pile a new paper. 😅
But what I found, particularly when we departmentalized our grade level, was that managing paperwork without a solid system wasn’t going to cut it any longer. If you missed it, last week my blog post talked all about tips and tricks for organizing a departmentalized classroom. You can click HERE to check it out!
Today we’re going to focus farther on my favorite system for managing paperwork. Now full transparency, I did invest some money into this system. It can be modified to fit any budget level that you have, as the overarching goal will remain the same, but I will try to link any of the items used in my setup if you’re interested in getting the same pieces for your classroom setup!
When we’re talking about papers and paper clutter, I tend to break it down into 5 different categories: To Be Used Papers, Papers in Limbo, To be Graded papers, To be sent home papers, as well as universal papers for all assorted needs.
To Be Used Papers
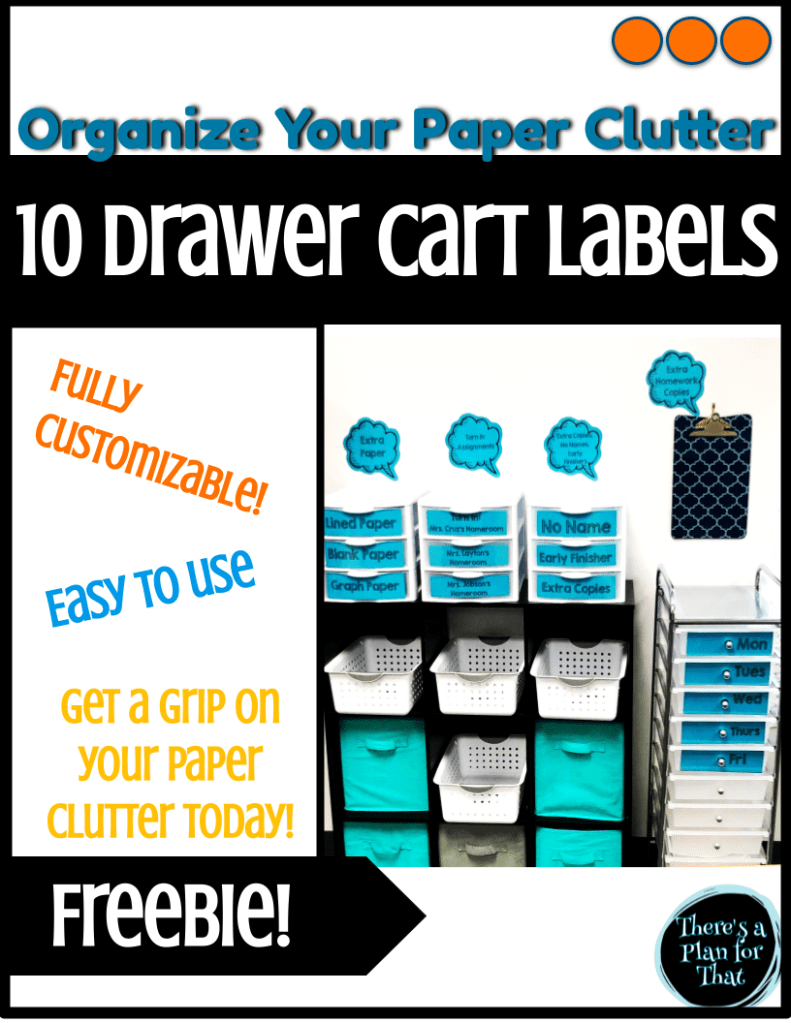
This category is where I would be thinking about my photocopies for the week. I tended to photocopy all of the papers I would need for a week at a time. The problem is, it can be very chaotic to store papers for 3 separate classes, for 5 days at a time, without getting everything jumbled. To keep up with copies in this category I used paper clips, sticky notes, and one of those 10-drawer, metal frame but plastic drawer carts.


I would label the top 5 drawers with Days of the Week Labels Monday-Friday. The 6th drawer I actually used as a place to hold any original copies that I had that needed to be photocopied for class the following week if I gathered them before I intended to do all the weeklong copies. (That way I didn’t have those master copy papers floating around on my desk without a home).
One thing to note, if you do try to purchase carts like the ones pictured above, please for the love of all that is good, shop around for coupons and best deals. As a teacher, you get a discount from Michaels. Places KNOW you want to use things like this in your classroom, take advantage of that fact, and wait for them to send out a sale. These go on sale every single year, if not multiple times a year, I promise! Also, when it comes to color choices, the rainbow drawers are beautiful! However, they are also very bright and not very versatile when it comes to cohesiveness in a classroom. I’m all about having a cute classroom, on a tight budget, without it looking “cheap”. One of the ways I’ve found to best stick to low budget classroom decor to achieve the looks I want is tending to go on a more neutral side when buying organizational pieces, and then adding splashes of color on top of it. If you still wanted that rainbow look, you could use different colored cardstock to make the drawer labels. Or if you wanted the drawers to be one main color in your classroom, you could base the color scheme of your classroom off a specific color of cardstock, and then you could design your decor around that color. If you’re looking for some easy drawer labels, look no further than this! I’ve got you covered. Go ahead and join my email list for your access to the free resource library. I’ve added a set of labels that are already sized and ready to go for your carts!
Papers in Limbo
Our next category is papers that don’t have a true home but aren’t ready to be tossed in the trash or returned yet. There are a few different types of this paper that I tended to have pop up repeatedly over the years that I have felt the need to make special places for; your classroom might have other kinds of papers that you need to make homes for as well!
In my classroom, the biggest pain points for my “Limbo” papers were extra copies of student homework, extra copies of student classroom for students who may have been absent or lost their papers, no-name papers, and early finisher paper copies.
Students are notorious for losing their homework, especially if you tend to do a packet style of work where it’s passed out for a period of time before you expect it back. It gets to the point that you will intentionally print a couple extra copies, just because you know one or two will be needed before the week is up. The problem is unless you designate a spot for those extra homework copies they just float around from table to desk, and you can never find them when a student actually does need them. Not only that, but it also means it becomes a task for you as the teacher to manage, passing out extra copies, rather than a task a student can do themselves if you don’t have a predictable place students know to go to find it. My solution was to attach a clipboard to the wall. It was super easy to add the papers each week, and visually it was convenient for my students to find the papers, and access them independently if need be.
For the other Limbo papers, the no names, the extra copies of weekly work, and the early finisher activities, I set up and labeled drawers. I used the 3-bin Sterilite drawers. I picked mine up at Walmart. I actually used 3 sets of the 3-drawer bins once this system was fully established, but I’ll talk more about the other bins as we continue on.

To be graded papers
These were the papers that students needed to turn in to the teacher. I used my second set of Sterilite 3-bin drawers so that each of my classes had a spot that they knew to turn in their papers. This was the ONLY place students were expected to turn papers into me at. I didn’t want them to hand it to me or put it on my desk or
my table because that was a recipe for me losing the papers before grades were ever even attached to it. It also became confusing because it wasn’t just my homeroom papers I was trying to keep track of, but also two other cores. Once I had a set of papers I would put a paper clip on it as well as a sticky note. I used 3 sticky note colors to help me keep track of the papers. Blue sticky notes reminded me to give a scored grade for the assignment. Green sticky notes reminded me to review the papers as a check for understanding, and an opportunity to assess who needed to be remediated on a topic, but that the grades weren’t needed for the gradebook. Once I had reviewed the papers, they could be stamped and returned back. Yellow sticky notes were for things that I knew didn’t need to be graded or stamped and could be just sent back directly. This made it easy for me to think once about what grades needed to go into the gradebook, not multiple times. It helped to prevent decision fatigue. Once I labeled piles with the sticky notes and the paper clip, I actually would move them to a bin designated for teacher use for each of the cores. The bins I used looked similar to the picture down below. The bins pictured below can be purchased from Hobby Lobby. I picked them up at Dollar General, but you can find them just about anywhere (including the dollar tree, though they wouldn’t be quite so hardy).

To be sent home papers
I’m not going to spend too much time on this category in today’s blog post because next week I will have an entire post diving deep into the idea of organizing and managing parent communication folders, specifically when managing a departmentalized classroom. But this category of papers is essentially talking about what you do with papers that are graded and need to be returned home, as well as any work that students have completed and turned in that might not have needed a grade, but still needs to be returned. This category also includes any papers you might be using to communicate something happening in the school with parents– think picture day or an upcoming class party or project. I used multiple systems for this, depending on the amount of wall space, and my willingness to invest in materials to make it happen. My preferred method of organization for the papers involved a plastic box with a secure lid (this lid was important– it allowed this to be very portable without the risk of papers spilling all over the place).

I loved this bin from Dollar General, it was the perfect size and height for what I needed and was able to hold the amount of papers generated by having 3 different classes’ worth of papers to be sent home. Previously I had used a similar but more narrow box from Big Lots.

This Big Lots bin was perfect when I only had my homeroom’s worth of paperwork to manage, but when I added two more classes, it simply wasn’t big enough to manage the load any longer.
In the bin, I would use a combination of hanging file folders and colored manila file folders with the different class colors and student numbers on them. There would be 31 hanging file folders, one to represent each student number, as well as one to hold papers that needed to be filed and set home. Inside each of the 30 hanging folders were a manila folder for each class I taught, under each student number. So for me personally, I had 3 classes, so I would have 3 number one folders in the number in the hanging folder. And each of my number one folders would be in the corresponding color connected to that class. (If you missed what I’m talking about with corresponding class colors don’t forget to hop over and check on last week’s blog post [here](insert link).)
Universal papers for all needs
The last category is probably the most straightforward. I found that as a math teacher, the easiest way to foster the habit of showing student work was to have access to paper. I used my final set of Sterilite 3-bin drawers (which were pictured above under the paper limbo category) to organize scratch paper. I kept 3 types of paper out and accessible for students, lined notebook paper, blank white printer paper, and graph paper. With the graph paper, I specifically used the type of graph paper that was most similar to what would be provided during our standardized state test, rather than the packs of printed graph paper you can buy from the store with the super small squares.

The choice to use that specific graph paper was twofold, first, the squares are bigger so it is easier for the students who don’t have amazing handwriting to see legible numbers inside of their squares. But second, it was a way to take some of the stress and pressure off at the end of the year during testing time. We know that kids are allowed to use graph paper, but if we never model HOW to use it, like to line up numbers when adding/subtracting, or for comparing place value, or fractions… If we don’t teach kids how to use it, then on the day of the test, we’ve only added another layer of intimidation, rather than a reassuring support to help them solve their problems. Therefore I found that using the same type of graph paper they would be exposed to was the most beneficial. (I’ve linked the download for the NC’s EOG graph paper if you would like to use that one in your classroom as well. Click the picture to download the graph paper.)
As lined paper was the cheapest of paper to come by, if students wanted paper for off-topic things, like drawing during indoor recess, that was the paper they could readily use. When it came to solving math problems from classwork or homework, they were welcome to use the blank printer paper, as well as the graph paper as needed.
Construction paper and card stock were stored in my supply closet as they weren’t a paper material that was necessary on a regular basis for the functioning of my classroom and its organization.
These five different categories of papers to manage in the classroom; To Be used papers, Papers in Limbo, To be Graded papers, To be sent home papers, as well as universal papers for all assorted needs; can be seen shown in the picture below. (With the exception of the to be returned papers, as that bin was kept in a separate part of the classroom.)

I hope that these ideas can be helpful to you in your classroom as a launching point for getting all of your paperwork organized. If you use any other great systems in your classroom, please let me know. I would love to see a comment from you!
Also, don’t forget to grab your free editable drawer tags that you can print and add to any drawers you are using in your classroom! You can click HERE to join my email list for your exclusive access to the password-protected Resource Library, where your download is waiting for you!


Leave a comment